Yes model rocketry is safe! When theNAR Model Rocket Safety Codeis followed, model rocketry is one of the safest outdoor activites for children and adults. Model rocket engines are responsible for over 500 million safe and successful launches since 1958.
You should always check with your jurisdiction, such as county or city for any special regulation that may be put in place within your area. Generally speaking you can fly most model rockets in LARGE, OPEN park grounds or school ground. For example a soccer feild or football feild will be a great area for a lauch site. Please make sure the launch pad is not near any dry grass or weeds as it could be a potential risk for fire. The NAR Model Rocket Safety Code provides information the best launch site dimentions based off the engine specs.
What weather conditions can I fly my model rocket?
Model rockets are not to be launches on windy or cloudy days. You do not want wind to interfere with your rocket's flight or have your model rocket turn into the direction of the wind. It is also important to never launch a model rocket into clouds because you cannot see what is within the clouds.
Can I fly my model rocket more than once?
Yes you can fly your model rocket more than once. Model rockets are are designed to be flown over and over again but remeber to follow the NAR Model Rocket Saftey Code when retreving your rocket. Do not attempt to retrieve your model rocket "from power lines, tall trees or other dangerous places". Always inspect your rocket before relaunching to repair any damage to the rocket from previous launch. You will then compelete the same flight preperation that you had used for your first launch. Repack the rocket with recovery wadding, refold and insert the paracute or steamer, remove the used engine casing and insert a new engine, start and engine plug. You will then be ready for blast off again!
How high can a model rocket fly?
Most model rockets can fly from 100 feet to 2,500 feet high! This will depend on the size, design of the model rocket and the engine used to launch it. Each of the model rocket is tested numerous times before it goes on market. This allows Estes to determine which engines are best for flight and altitutdes that can be reached. This information can also be found on the packaging for the model rocket purchased.
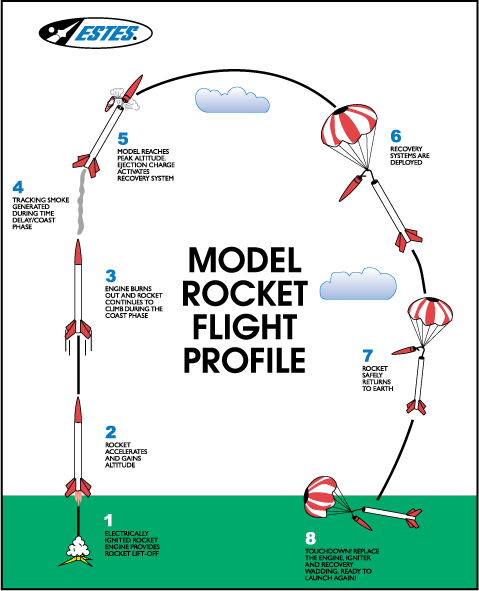
Upon rocket ignition with an electronically operated launch system, the model rocket engine's propellant begins burning. This is the thrust phase, which provides liftoff and powered acceleration. After the engine's propellant has finished burning; a timed delay charge is activated. The delay charge provides no thrust but instead it allows the rocket to coast to the rocket's highest altitude during flight. The delay charge also provides tracking smoke so you can better see your rockets flight path. Once the delay charge is done burning the ejection charge is then initiated. The ejection charge creates pressure in th rocket's body tube that causes the recovery system (parachute or streamer) to deploy. The rocket then returns to earth gently with the help of the recovery system so it can then be prepared for another launch.
Can I use my rocket engines more than once and how should they be stored?
Model rocket engines do not have a self life, so as long as they have always been stored within a cool dry place and were not exposed to high humidity, extreme heat or extreme cold (temps between 140 degrees to 32 degrees fahrenheit) your engines should preform properly. You will still need to watch for erosion of the clay cap and dark propellant showing on the sides of the engine. If your engine appears to be damaged then the engines may have been subjected to extreme influx in tempratures and humidity. If the engine is indeed damaged please soak the engine in water until they disinegrate then discard them within an outdoor waste bin. Never leave rocket engines in your car as this can cause damage to the rocket engine and make it unuseable.
Disposal of rocket engines
Soaking model rocket engines in water until they desinegrate will render the engine harmless. The outer casing is paper and the glue is organic and non-toxic. All internal components and natural clay material within the engine will fall to the bottom. These remnants can now be disposed of into an outdoor waste bin or trash can. All components are basically harmless alone and not dangerous to people or the landfill in small quanities. If the remnants of the engine are left together to dry completly they are very likely to become flammable but should not pose and a geart hazard as long as they are not "re-mixed"
Why do I need to use recovery wadding?
A) Scorched parachute:
This occures when the recovery wadding is crumpled into tight little balls and then inserted into the rockets body tube. This will end up leaving gaps around the wadding allowing hot ejection gases to slip around the wadding. Each piece should be crumpled into loose ball shapes before inserting into the rockets body tube which will then eliminate any air gaps. Always visually check the wadding after you have inteserted it. You will need to look down the body tube to see if any light can be seen around the edges. If light does show through the body tube around the wadding you will need to repack the wadding again. This insure proper saftey while using your model rocket.
B) Substituting tissue paper for recovery wadding:
NEVER substitute the recovery wadding as it is specially treated with flame retardent. When the engines ejection charge goes off it produces hot expanding gases that push the nose cone and parachute/streamer out of the rocket. Recovery wadding provides a physical barrier between the ejection charge and the parachute/streamer to prevent any hot gas from melting it. If ordinary tissue paper is used it will result in the tissue paper catching fire and buring as it floats to the ground.
Why did my rockets parachute not deploy?
There are several things that can cause a recovery system failure
A) The nose cone does not come off during launch:
Too much recovery wadding has been inserted into rocket body or the recovery wadding is packed to tightly
The parachute or streamer binds up in the rocket body because it was not packed small enough. The recovery system should slide easily into the body tube when properly prepared.
The engine falls out of the rocket before the ejection charge has been initiated. This is caused becaause the friction fit engine mount did not hold the engine in. To ensure this does not happen you can put tape around the engine to make it a tighter fit within the body tube.
The nose cone was assembled to tightly to the rocket body. This can be resolved by sanding the nose cone's shoulder which should then allow the nose coe to easily slide onto the body tube.
Check parts of the shock cord or shroud lines to make sure they are not caught by the nose cone.
B) Parachute or Streamer fails to open
Cold weather can play a role in this as the plastic wants to stay confined to that shape when it is cold. To avoid this you will want to pack the system just before you are about to launch.
Hot and humid weather can cause the plastic to stick to itself and can be remedied by adding a dusting of baby powder before packing the recovery into the body tube.
Insufficent amount of recovery wadding or the wadding being to tightly crumpled can cause a recovery system failure. This is due to the heat from the ejection charge causing the recovery system to melt.
What type of glues work best to assemble my model rocket?
Adhesives that work well on porous material such as balsa wood may not work on nonporous materials such as plastic. Carpenters glue or wood glue will work well when bonding balsa and paper parts together. It does not work well when bonding a plastic nose cone to other parts that are not plastic. When bonding plastic with plastic we do recommend using a plastic cement.
You can also use certian type of CA glues for bonding both porous and nonporous materials together. While the CA glue bond to plastic is good, it is not any better thana solvent-based adhesive, such as a plastic cement or liquid cement.
I want to apply balsa fins on my rocket but they will not stay on when glued. How do I fix this?
A) The best glue to apply balsa fins is carpenter's wood glue. This glue will dry quicker than most other glues.
B) Fin gluing techniques can allow better bond to the rocket body. Below are the different techniques that can be used.
To create a tight bond you will need to firtst apply a layer of glue to the root edge of the fin. You will want to work the glue into the pores and grains of the wood. You will need to repeat this step for all fins that will be attached to the rocket.
By the time you have completed the last fin (1-2 minuntes), the first fin will have become tacky if not almost completly dry. You will then apply another thin layer of glue to the first fin you glued.
You will now hold the fins rear part of the root edge in position on the rockets body tube. With gentle pressure angle the fin's root edge up against the body of the tube until the the root edge has made contact, then hold the fin in place for 10 seconds. This gradual attachment of the fin will act as a squeegee to force out any trapped air at the connection. If any air pockets are not pushed out it will cause a weaken joint.
Now release the fin and you should find it secure.
TIP: It is best to hold the rocket vertically when the fins are drying. You can stand the rocket on its nose (without nose cone). You can also use heavy objects such as books to keep the rocket in place while gluing. Be careful to not crush to rocket body when using heavy items to keep it in place.
Does your rocket seem to drift away? Here's a few tips to reduce the effects of drift.
To reduce the effects of drit beyond tilting the launch rod you can do any of the following below.
Cutting a spill hole. The plastic parachute has a circle at the top that can be cut out, this allows more airflow which will in turn increase the descent rate of the model rocket back to the earth. This modification is a permanent modification and can not be reverted back.
Reefing the parachute. To do this gather the parachutes shroud lines together at the mid-point, you will then wrap a piece of tabe around it to secure in place. This method prevents the parachute from opening fully which will make the rocket descent faster. Please note that on days when there is no wind you can remove the tape and use the rocket as normal. This modification is temporary and can be reverted back to normal.
Switch to a streamer. A streamer generally allows the model rocket to desend much quicker than a parachute does. If your rocket is equipt with a parachute you will want to remove it and attach a streamer in place. Using snap swivels is a great way to make recovery system easily interchangeable such as that with the streamer.
How to test a model rocket launch controller.
Always test your model rocket launch controller before launch to insure continuity/circuitry.
Make sure you have correctly installed new, alkaline batteries per launch controller instructions
Attach your launch controller's micro clips to each other
Insert the saftey key into the launch controller keyhole and push down reasonable hard until the black rubber saftey spring (located under the saftey key) is fully compressed. This will insure the key will make a complete circuit and the launch controller's light should illuminate brightly. (If the light is dim or flickering this can indicate bad batteries or the battery contacts within the controller are dirty and need to be cleaned.)
While continuing to hold the saftey key down hard, press the lauch controllers lauch button. The launch controllers light should then go off.
If steps 1 through 4 are completed and the controller responds as it should then your launch controller is ready to go.
Please rememeber to always keep the launch controller key removed from the keyhole until you are ready to launch.
How to use a model rocket launch controller at launch time.
Make sure you have correctly installed new, alkaline batteries per launch controller instructions
Make sure your model rocket is prepared for launch and installed on the launch pad with the correct engine and starter installed per model rocket instructions.
You will now attach your launch controller micro clips to the starter wires of the correctly installed starter. Double check that your micro clips are not touching each other or the blast deflector plate.
Extend your launch controller wires fully. This will be 16.34 feet when using engines A through D and 30 feet when using engines larger than D.
Now insert your saftey key into the keyhole of the launch controller. You will need to push down hard to make the key is secure and the launch controllers light is brightly lit.
Continue to push the saftey key down hard and begin the countdown. "5-4-3-2-1 Launch" Doing the countdown insures everyone is at a safe ditance before lauch.
At "launch" you will press the launch button on the controller with your other hand, while still holding the key down with the other hand.
If you happen to stop pressing the saftey/launch key down when the launch button is pushed you will break the cicuit/connection and your rocket will not launch.
What to do when your model rocket engine fails but the starter is still good.
If your model rocket engine fails to egnite upon launch you will need to remove the safety key from the launch controller, then wait ONE minute before approching the launch pad. This is to insure your safety as there could be a chance the engine will still ignite and launch as normal. If the starter is still good and has not bunred up please follow the below steps.
Check the launch controller batteries to make sure they are put in correctly and are not needing to be changed out. If the batteries are weak it will illuminate the continuity light but not be powerful enough to initiate the starter. (This light may flicker or be dim)
Check the battery contact springs. If you can hear the batteries rattle when moving/shaking the launch controller it can mean the contact springs are compressed. The continuity light on the launch controller will not ilumitate when this happened. You will need to open the launch controller and spread the contact springs out then re-insert the batteries.
Check the launch controllers micro clips. After a few launches with your model rocket, exhaust residue will build up on these clips preventing continuity. This will cause the continuity light to not illumicate. You will need to clean the micro clips with sandpaper or steel wool to achieve a clean clip. If the micro clips are touching each other it will cause the system to short out and the continuity light will not illuminate. Make sure the clips are seperated and no longer touching before re-launch.
Check the starter. A broken starter will be indicated by the continuity light as it will not illuminate. If the starter wire is indeed broken you will want to replace it with a new one. If the starter wires are touching each other near the tip it will short the system out and the continuity light will not illuminate. Gently seperate the wires making sure to not break the tip apart, you will then reinstall the starter and engine plug.
What to do when your model rocket engine fails but the starter is burned.
If your model rocket engine fails to egnite upon launch you will need to remove the safety key from the launch controller, then wait ONE minute before approching the launch pad. This is to insure your safety as there could be a chance the engine will still ignite and launch as normal. A burned starter means the starters tip wasnt touching the propellant. You can usually tell that the starter has burned up because the tip is no longer connected by the bridge wire. If this is the case you will then replace the starter wire within the engine.
Not sure how to install a starter into a model rocket engine? The steps below will show you how.
Hold your model rocket engine upside down. (Opening at bottom pointing up)
Get your starter and insert it gently into the engine's nozzel or opening. The tip of the starter should be resting against the engines propellant. The contact between the tip of the starter and engine's propellant is important as it isures proper initiation during launch.
Be careful to NOT bend the starter as this could result in the starter pulling away from the engine's propellant and will not provide proper initiation.
Continue to hold the rocket engine upside down when inserting the engine plug. The insertion of this plug will bend the starter wires a minimal amount but should not pull the starter away from the propellant.
Once the engine plug is holding the starter firmly in place you can then bend the starter wires away from each other. It is important that the starter wires do not touch each other - either below or above the tape - to avoid a short circut.
Now you can install your rocket engine into your model rocket per the model rockets instructions.
What do I do if my model rocket lifts off the launch rod slowly or gets stuck?
You will need to clean the launch rod with steel wool as exhaust residue can build up. This prevents the launch lug from sliding over the lauch rod easily.
Check the launch rod joint to see if the connecting joint has a rough edge. A rough edge on the connecting joint will catch the launch lug and prevent the rocket from passing that point. To remove this you will lightly sand the rough edge until smooth.
Check the launch lugs on your model rocket.
If you model rocket only has one launch lug and it is not correctly aligned with the rockets body tube. This can cause the direction of the engine thrust to be different from the launch rod orientation which will cause binding. Visually chek the lauch lug to make sure it is parallel with the rockets body tube.
If your model rocket has two launch lugs that are not correctly aligned with each other it will cause the rock to bind on the rod, which will cause the rocket to not launch. To check this place the rocket on the launch rod to ensure the rod slides easily through both lugs.
Understanding what the engine codes mean on rocket engines
Each model rocket engine has a letter number - number code such as B6-4 or A6-4
What does the first letter indicate?
This indicates the total power produced by the engine. Each succeding letter has up to twice the total power as the previous letter. For example a "B" engine has twice the power of an "A" engine.
What does the first number indicate?
This number refers to the average thrust of the engine. The average thrust is the engines ability to push or how fast the engine power the rocket to go. The higher the first number is the faster the speed of the rocket will be. Higher thrust engines may be the best choice for heavier model rockets or model rockets with a higher drag force, such as a larger diameter. For example a B"4" engine with have a lower trust which will not allow the rocket to go as high up. A B"6" engine which will have a greater thrust which will allow the rocket to higher than a B4 engine.
What does the final number indicate?
This nunmber refers to the timed delayed in seconds between the end of the thrust phase and the ignition of the ejection charge. Selecting the correct time delays allows your rocket to reach the best height for the recovery system to be deployed. Any engine code ending in "0" will have no delay and are used for booster stages and special purpouses only. Any engine ending in "P" have no delay or ejection charge and the end is "plugged" so that no hot gasses are released from the forward end. For example a B6-"4"will have a 4 second delay before the recovery system is deployed, a B6-"6" will have a 6 second delay before the recovery system is deployed.
BEGINNER - normally these are designed with simplicity in mind and have pieces that don't require gluing and easy to assemble
INTERMEDIATE - this skill level will normally take longer than an hour, and require more time for assembly
ADVANCED - this skill level will normally take longer than an hour to assemble and has more involved instructions and detail factored into the final product
EXPERT - this skill normally takes 3 or more hours to assemble and is for the more experienced rocketeer
MASTER - this is for the skilled rocketeer and usually takes the higher powered engines and can include more detail to the actual design of the rocket to "replicate" the original model of the rocket.